Installation
This document will walk you through the installation process of CFDEM®coupling. First Aspherix® needs to be installed using its installer. OpenFOAM® and CFDEM®coupling are then installed. Finally, basic test cases are run to verify the successful installation.
As prerequisites OpenFOAM-8 and cmake >= 3.10 need to be installed. On Ubuntu 18.04+ cmake is installed during the OpenFOAM® installation with an appropriate version.
Note
All steps described in this article are also available as video tutorials on the Aspherix website.
Install Aspherix®
Before installing CFDEM®coupling, it is necessary that Aspherix® is propertly installed on your system. For more information regarding Aspherix®, please visit the official website. You receive details of the Aspherix® installation together with the Aspherix® installer as part of the provided documentation. The default installation location of Aspherix® on your system is $HOME/DCS-Computing. You can test your Aspherix® installation by typing in your console:
aspherix
Which should lead to the output Aspherix (Version …) Checkout of asx_solver OK.
Install OpenFOAM®
The easiest way to install OpenFOAM® on your system is by using the package manager, as it is described in the next paragraphs. In case this is not an option for you, you can find some optional installation information in the following page:
As a prerequisite for the OpenFOAM® installation you need to download and install additional software (see the OpenFOAM webpage for more details), which you get for Ubuntu 18.04 by executing in the terminal the following command:
sudo apt-get install build-essential flex bison git-core cmake zlib1g-dev
libboost-system-dev libboost-thread-dev libopenmpi-dev openmpi-bin gnuplot
libreadline-dev libncurses-dev libxt-dev
For many Ubuntu systems there are packages including OpenFOAM® and Paraview®
provided by OpenFOAM.org (find complete instructions for
Ubuntu),
which can easily be installed using the “apt” package manager. Basically the
dl.openfoam.org repository must be added once to the list of software repositories.
This is done with the terminal command:
sudo sh -c "wget -O - http://dl.openfoam.org/gpg.key | apt-key add -"
sudo add-apt-repository http://dl.openfoam.org/ubuntu
Then OpenFOAM® is installed using the terminal commands:
sudo apt-get update
sudo apt-get -y install openfoam8
Finally you need to “enable” the installed package by adding some lines to your
.bashrc file. Open the .bashrc file by typing:
gedit ~/.bashrc
Then add the following line to the end of the file and save the changes.
source /opt/openfoam8/etc/bashrc
For testing your installation, please open a new terminal window (!) and test
that the simpleFoam application is found. Type into your terminal
simpleFoam -help
and execute it. You should get a “Usage” message printed to screen.
Note
The current version of CFDEM®coupling compiles only with OpenFOAM® in version 8.
Install swak4FOAM (optional)
swak4FOAM is a library of tools which open functionality otherwise only
available by implementing new models. It is used in some test cases, mostly
for post processing. To run these test cases without swak4FOAM, remove the
related calls which are usually found in the functions subDict in
controlDict.
To install swak4FOAM go to your OpenFOAM folder and run
# clone repo into swak4Foam ub folder
git clone https://github.com/Unofficial-Extend-Project-Mirror/openfoam-extend-swak4Foam-dev.git swak4Foam

# go to cloned folder
cd swak4Foam
# checkout version compatible to OpenFOAM-8
git checkout 0f570f524c0e3be44155cdf0f7623c5403f234d3

# build
./AllwmakeAll
All dependencies and package requirements should already be installed from the package installation during the OpenFOAM installation process.
Note
If encountering compilation problems with swak4FOAM, try first to run the
compilation on a single core by running export WM_NCOMPPROCS=1 before
invoking ./AllwmakeAll.
Install CFDEM®coupling
You should have received a zip archive named “CFDEMcoupling-BASIC” containing
CFDEM®coupling. Please, unzip it into the folder $HOME/DCS-Computing.
Alternatively, you may have received access to a repository containing a custom
version of CFDEMcoupling. In this case, please clone the repository into
$HOME/DCS-Computing.
As a second step, you need to set some environment variables
in ~/.bashrc (if you use c-shell, manipulate ~/.cshrc accordingly). Open your
$HOME/.bashrc file and add the following block to the end of the file.
The following example assumes that you are using the “CFDEMcoupling-BASIC”
version. In other cases you need to change the CFDEM_VERSION environment variable
in the example below or modify other entries if necessary.
#================================================#
#- CFDEMcoupling SETUP
export CFDEM_VERSION=BASIC
export CFDEM_PROJECT_DIR=$HOME/DCS-Computing/CFDEMcoupling-$CFDEM_VERSION
export CFDEM_PROJECT_USER_DIR=$HOME/DCS-Computing/$LOGNAME-$CFDEM_VERSION
export CFDEM_bashrc=$CFDEM_PROJECT_DIR/src/lagrangian/cfdemParticle/etc/bashrc
export CFDEM_ASX_INSTALL_DIR=$HOME/DCS-Computing/Aspherix-6.0.0
. $CFDEM_bashrc
#================================================#
Then open a new terminal so that above changes to your .bashrc become active and test your setup by typing:
cfdemSysTest
Note
Many useful aliases are set with sourcing of the
CFDEMcoupling bashrc, e.g. cfdemEtc . Make use of them!
Note
Please note the output of the number of threads per core and the recommendation for the CFD-DEM hyperthreading setting.
Note
On some systems, as RHEL and CentOS the MPICXX library is needed additionally within the system linker paths. Please add CFDEM_ADD_LIBS+=-lmpicxx CFDEM_ADD_LIBS+=-L/path/to/lmpicxx to src/lagrangian/cfdemParticle/etc/addLibs_universal/additionalLibs_solver.
In addition to the requirements stated above for OpenFOAM,
CFDEMcoupling requires cmake to build.
To compile CFDEM®coupling open a new terminal and run
cfdemCompCFDEM
It compiles the CFDEM®coupling libraries, CFDEM®coupling solvers and CFDEM®coupling utilities. The compilation will stop, if build errors occur.
The compilation is automatically logged and the logs can be found in:
$CFDEM_SRC_DIR/lagrangian/cfdemParticle/etc/log
In case questions concerning the installation arise, please feel free to contact DCS Computing.
Note
Here we assume you have already installed Aspherix® at the default location
$HOME/DCS-Computing, and we assume you have
installed OpenFOAM®. Further we assume you are using
the CFDEM®coupling version CFDEMcoupling-BASIC, otherwise please
change the commands according to your CFDEM®coupling version.
Note
Some tutorials rely on swak4Foam for additional postprocessing steps.
Setup Paraview Macro
To facilitate data loading a paraview macro is available to split loaded OpenFOAM / CFDEMcoupling data into separate blocks for internal field, patches, and –if present – particles.
Note
The macro is automatically installed during compilation. This means that you need to perform the steps described below only if you want to use the Macro on a system (or for a user) where no CFDEMcoupling is compiled.
To use this macro copy it from its location to the Paraview Macro folder:
cp -r $CFDEM_ETC_DIR/paraview/CFDEMcoupling* <pv_macro_dir>/
where the pv_macro_dir is:
- on Linux:
  $HOME/.config/ParaView/Macros'
- on Windows
  %userprofile%\AppData\Roaming\ParaView\Macros
On Linux (assuming the above location of the Paraview config folder) you can also use:
cfdemInstallParaviewMacro
After loading CFDEMcoupling simulation results you can run the CFDEMcoupling
macro to split up the multiblock data, see Figure 1.
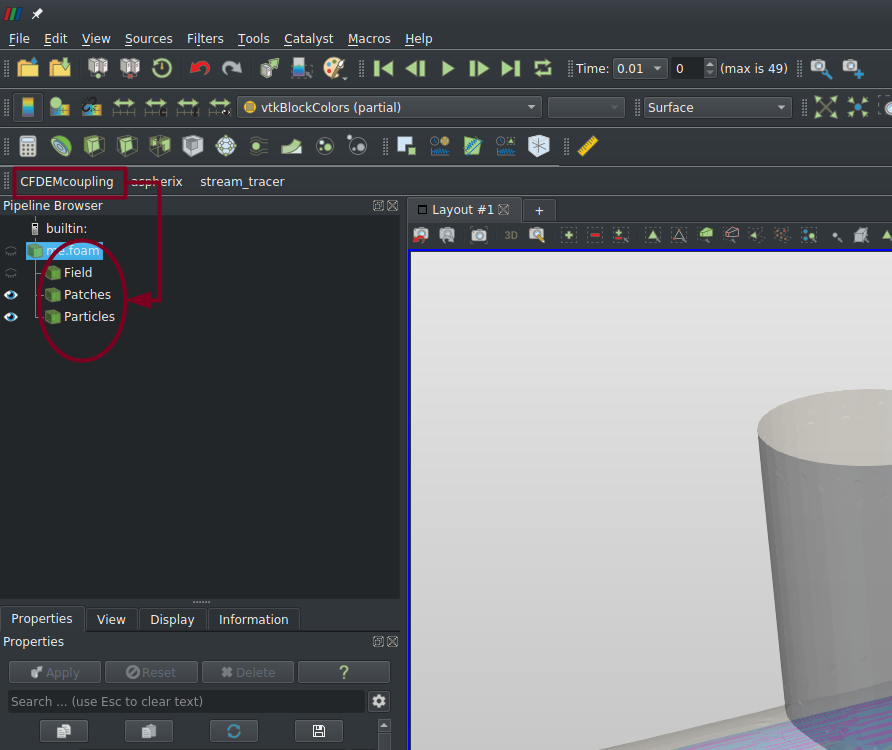
Figure 1: CFDEMcoupling results split using the paraview macro.
Note
Select all blocks when loading the data.
Test the installation
A simple way to test your installation is by running a tutorial case. In order to run a single tutorial it is recommended to use the Allrun.sh scripts in the tutorial directories. They execute the simulation and provide some basic output (e.g., comparison of simulation output with an analytic solution).
Now we describe briefly how to run a simple test case, settlingTest, which models the settling velocity of a single sphere.
Open a terminal and navigate to the tutorial folder:
cfdemTut
cd cfdemSolverPiso/settlingTest
Run the simulation by executing the “Allrun.sh” script in the terminal:
./Allrun.sh
This will trigger Aspherix® to start the DEM simulation and CFDEM®coupling to start a coupled CFD-DEM simulation. Both simulations will communicate via socket and exchange the necessary data, e.g. particle position and velocity is communicated from DEM to CFD and the drag force is communicated from DEM to CFD. When the simulation is finished, a plot of the particle settling velocity pops up. The simulation result is compared to the analytical solution. You can visualize the simulation data using, e.g. Paraview.
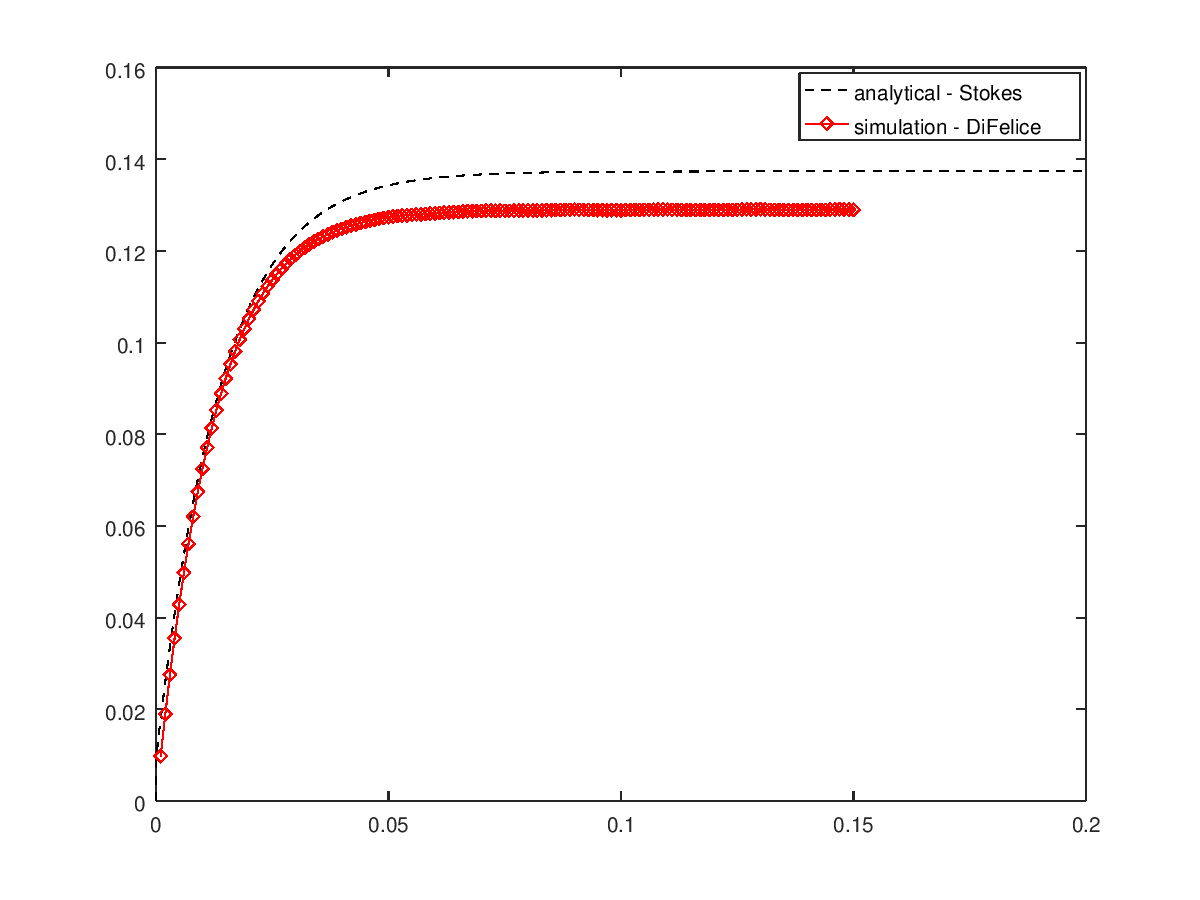
In above plot the particle velocity (settling velocity) is ploted over time in red. The black line gives the analytical solution for the settling velocity using the Stokes drag law. Therefore, a slight offset between red and black line is to be expected.
You can run all the tutorial cases sequentially by executing the alias cfdemTestTUT. For running pure Aspherix® cases, you can use the aliases
cfdemAspherix inputScriptName
cfdemAspherixPar inputScriptName nOfProcs
In the tutorials section you find more details on setting up and running a tutorials.
Note
If you want to run your own cases, it is recommended to first copy the tutorial
case to $CFDEM_PROJECT_USER_DIR/run which is automatically being generated.
E.g., copy one of the tutorial cases there, and adapt it to your needs before
running. This helps you keeping the tutorial in its original clean and working state.
Install Helyx®OS (optional)
If you are interested in using a GUI based workflow for setting up your coupled CFD-DEM cases we recommend having a look into Helyx®-OS provided by Engys.
Note
This is to be considered only a first “proof of concept” of combining CFDEM®coupling and Helyx®OS, which is planned to be streamlined in the future.
You can find detailed installation instructions for Helyx®OS here.
Basically it boils down to downloading the installer from this link.
Then you need to change the permissions of the file by typing to the terminal
chmod 755 HELYX-OS-2.4.0-linux-x86_64.bin
And finally you need to execute the installer in a terminal by typing
./HELYX-OS-2.4.0-linux-x86_64.bin
Note
It is not required to install GUI + Kernel as you can use the OpenFOAM® version installed as described above. So please select only the components HELYX-OS-GUI. During installation the destination folder is being queried. As a default your user home directory is a good starting point. Simply type “echo $HOME” in a terminal to see the path.
For a simple start of Helyx®OS we recommend to add to your ~/.bashrc (right above the definition of CFDEM_VERSION) the path of your Helyx®OS installation (you can find the correct path by looking for the file HELYX-OS.sh):
export CFDEM_HELYXOS_DIR=$HOME/Engys/HELYX-OS/v2.4.0
In order to check your environment variables you can use the command
cfdemSysTest
, which will show your settings and if they are complete and correct. After defining CFDEM_HELYXOS_DIR you can start Helyx®OS by typing to your terminal:
cfdemHelyxOS
After the first start you will have to define the paths to your OpenFOAM® installation. Please add
/opt/openfoam6
to Edit/Preferences/Core Folder.
Install OpenFOAM on Windows
You can run OpenFOAM® and CFDEM®coupling natively on Windows unsing the Windows sub-system for Linux (WSL).
To prepare your Windows system, check that you have updated your Windows 10 to at least version 2004, e.g. displayed in Settings -> System -> Info -> Windows specifications. If you do not have this version installed, run the update from Settings -> Update & Security -> Windows Update.
Note
You can force the update of Windows 10 to version 2004 as described in this manual.
Activate WSL by opening the PowerShell as Administrator via the start menu and execute the command:
Enable-WindowsOptionalFeature -Online -FeatureName Microsoft-Windows-Subsystem-Linux
When prompred choose to restart Windows.
When rebooted, open a new PowerShell terminal with Administrator privileges and execute:
Enable-WindowsOptionalFeature -Online -FeatureName VirtualMachinePlatform
Again, when prompred choose to restart Windows.
After the second reboot, start a new PowerShell terminal with Administrator privileges and to switch from WSL1 to the newer version WSL2, execute:
wsl --set-default-version 2
Now, WSL2 is set up and we proceed by installing a Ubuntu virtual machine which will be used by WSL.
Start by opening the Microsoft Store and search for
Ubuntu 18.04. Click Install. This will download the system image and may take some time depending on your internet connection.Start Ubuntu 18.04 from the start menu. This step will set up Ubuntu. In the process you must choose a username and a password for that user. These do not need to be identical with your Windows credentials.
Within the Ubuntu system run the following commands to update the package repository and install required tools:
sudo apt-get update
sudo apt-get install build-essential
sudo apt-get install nautilus gedit
sudo apt-get install xfce4
Open your bashrc (e.g. using
nano)nano .bashrc
and add the line
export DISPLAY=$(cat /etc/resolv.conf | grep nameserver | awk '{print $2}'):0at the file end. Save the changes. If using nano, this is done using
Ctrl + ofollowed byCtrl + x.Create links to acces the Windows file system more easily:
ln -s /mnt/c/Users/yourUserName/Downloads winDownloads
ln -s /mnt/c/Users/yourUserName/Documents winDocuments
Close the terminal.
Install Paraview on Windows
To run graphical programs on the Linux machine you need to additionally install an Xserver on your Windows. Fir this purpose we recommend VcXsrv. After installing VcXsrv, start it using the application Xlaunch.
Note
When doing so make sure to activate the checkbox “Disable access control”.
Restart the ubuntu terminal.
In the terminal type
startxfce4 &
to start the graphical user interface.
Now, you are ready to proceed with the normal installation of OpenFOAM and CFDEMcoupling as described above within the just set up Ubuntu sub-system.
Note
After the installation of Aspherix-GUI you need to change the path of the Paraview installation to point to the one installed in Windows.
Footnotes:
OPENFOAM® is a registered trade mark of OpenCFD Ltd, producer and distributor of the OpenFOAM software via https://www.openfoam.com.
HELYX® is a registered trade mark of Engys Limited, producer and distributor of the Helyx software via https://engys.com.